

Click here to see the completed site featured in this post.
Somewhere around spring of 2017 I returned to Seattle and met some friends for drinks after a year working and living remotely as a digital nomad in Europe. As good conversations with old friends often is wont to do, the conversation ranged across any and every topic and some lively debates ensued. Eventually, the conversation got on to government and discussing where our tax dollars went. Pretty quick it became clear that no one at the table could accurately (or even inaccurately) describe where our tax dollars went except to ‘The Government’. One friend threw out the statement that it would be great if there was some calculator that you could put in your salary and get a breakdown of how much of your taxes went to the various government services and departments. The conversation quickly moved on and that statement was forgotten for some time. Then a few weeks later it was brought up again and the idea mentioned again as something that should be done…. and then, just two weeks ago (Late July 2018 as of this writing), one individual who was in that original conversation ended up in a similar conversation with old friends and mentioned that idea. All those present unanimously agreed that they would love to be able to know where their tax money went and in what proportions.
So here we are. The idea is clearly something that people have said they’d like and it’s something that I think I can build with a little time using a Sinatra app and would be my very first public app that could actually get some users. So I decided to give it a go.
Laying Out the App and the First Commit
To get things moving and off to a good start, I decided that rather than to build everything from scratch, I could copy most of the base code from my simple portfolio site to use as a template. This way, rather than having to spend time rebuilding the basic functionality and style sheets, I can just delete the irrelevant parts and update the parts that I want to keep. Doing this saved me a fair bit of time and let me get right to thinking about how I wanted the site to function.
What jumped out at me right away was that to keep things simple all it really needed to be was a form that would collect the users salary and state that they are located in, and then process that through a ruby app on the back end to get the proportions of how the tax dollars are split out before then displaying that information on the same page as a nicely formatted table. Nothing fancy, but it will work and will do what it needs to do. The only other pages that i’ll need will be an about page, possibly a page explaining the methodology or other educational information, and then the standard privacy policy/t&c’s information. I’ll also add google analytics to the site which will be the first time that i’ll be adding that to a website that i’ve hand coded (I use it all the time on wordpress sites) and then the one other thing that i’d like to add which I haven’t worked with before is a database to save the form entries. I think there could be some interesting data gleaned from the types and locations of people who fill out the form which might make for some fun datavis later on so I want to capture that from the start. This means that 1) i’ll have to design with GDPR in mind since i’ll be both tracking users (with GA) and will be retaining data. This should be easy to comply with since I don’t intent to hold any personally identifiable information (PII), but something i’ll have to check into anyway even though the tool isn’t intended for non-US individuals. And 2) is that i’ll have to figure out what kind of database i’ll need and then learn how to save the data to it. It doesn’t seem too hard, but is something i’ll have to make a decision on up front.
Milestone Commit 0: Initial Commit – Just the basic file structure and the individual files that I copied over from the portfolio project.
Choosing a Database
Since i’ve never worked with a database in one of my projects so far, this is all new to me. Cue the internet. Some research was necessary to figure out what would be the right choice for a database. I knew that Postgres, MySQL, and SQLite were the three main choices, but I don’t know much about any of them other than Postgres seems to be the new, cool kid on the block and that MySQL/SQLite have been around a while and are the solid workhorses who are tried and true but maybe not as sexy. I did some searching around and this article from DigitalOcean ended up being a huge help for laying out what each is good at and what each might be overkill for.
As I understand it (and I could be wrong here), SQLite is the simplest of the three. It’s good for some basic applications and for testing purposes. It only allows one write process at a time and only allows one client to access it at a time. I’m hoping that this app will have more than one person accessing it at a time, so it sounds like SQLite is out. MySQL sounds like it has a strong community, is fairly quick and secure, and can handle a lot of data at once. It’s not fully SQL compliant, but for this purpose that it probably ok. It also sounds like there are some complaints that it’s not being maintained as well as it could be these days. Lastly, Postgres sounds like it’s the tricked-out Ferrari of the the three. It’s powerful, extensible, has a big community, and customizable. Downside is that it is complete overkill for most smaller projects, can actually have worse performance if it’s not being used properly, and can be difficult to host properly. Sounds like MySQL is the goldilocks for this project.
Database = MySQL.
Some Basic Styling
I like to lay out some of my visual elements first so that I have something nice to look at while working on other elements of the project. In this case, I wanted to have a little bit of front end before I dove into the back end work; if only so that I had something to work with when connecting the front and back ends later on. Just a personal preference. I could have just as easily started working on the ruby scripts that will power the back end.
Most of the front end html structure is from my portfolio site. I just picked a few pages I liked and am repurposing them. Same goes for the layout.erb file. They’re all getting a css makeover though. This article from freeCodeCamp was helpful for designing a more stylish menu bar and bringing some of my other css elements up to par for this new project. CSS is one of my weaker skills when it comes to development, and probably the one area that I have the least patience in, so following tutorials like the one above help a lot for sanity…
A little visual styling.
This isn’t at all the final version of the site design-wise. But a little added visual styling makes for a nicer experience in the rest of the development process. While I was at it, I also added some blank placeholder pages that will be needed later such as ‘About’ and ‘Privacy Policy’. I didn’t want to forget to link them up later on so I went ahead and put them in even though I won’t be working with them for a while. It’s good enough for now, so it’s time to move on to some more meaty parts of the project.
Milestone Commit 2: Added CSS styles and touched up the visual appearance of the index, added placeholder pages.
Thinking About the Data
From here I needed to start thinking about what data I was going to need to collect from the user, how I was going to collect that data, and then what kind of processing I would need to do to return the information that they would be expecting to get. Seeing as I am not a tax expert, nor do I play one on the internet, a little research would be needed. I even do my own taxes, but I use services like HR Block which do all the heavy lifting for me so I really don’t know much of what’s going on under the hood.
Let’s take a look at how the Federal tax brackets are laid out and just what kind of information we will need. This article on NerdWallet was pretty much all I needed to start planning out the meat of this app. It’s got the tax brackets laid out for different tax filing statuses, and a simple description of how income is taxed at different rates rather than just one flat tax as most people believe (ie, at $32,000 of income the first $9,525 is taxed at 10% and then the remaining $22,475 is taxed at 12%, even though you’re in in the 12% tax bracket).
At this point it’s worth mentioning that I had to make a decision about speed to launch vs accuracy. The purpose of this app is to demonstrate, at a high level, how much of your taxes go to different departments in the Federal government budget- not to be a tax planning tool. Since awareness and transparency is the ultimate goal, I decided that for the first version of the app, I wouldn’t worry about this cascading/graduated taxation of income and instead just use a flat tax based on the appropriate tax bracket. ie, if a user enters $32,000 as their income then the app will apply a flat 12% tax rather than breaking out the first $9,525 etc. I also made the decision that for the first version, state income tax will be disregarded. Including both of these items will be the main priority of V2, but again, at this point shipping something is better than not shipping at all.
So what data do I need to capture?
- Gross Income
- Tax Filing Status
- State the User Resides in (V2)
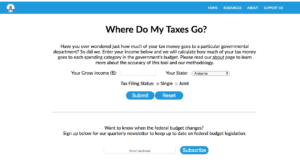
Translating this into an html form for the front end we get something that is starting to look like a real website:
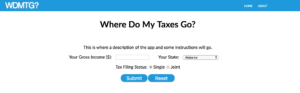
Starting to look like a real site!
And on the back end it’s time to start building some methods to return the appropriate tax rate and flat tax (if appropriate). Basically, I just took the table on that NerdWallet article above and turned it into two methods (one for single filers and one for joint filers) that accepts a gross income and returns the tax rate and the flat tax if applicable. The next step will be to build a method that uses those values and actually calculates the user’s total tax obligation.
Milestone Commit 3: Added front end form to collect data and built back end method for tax rates.
Building the Back End
From where I left off, the next step is to build something that takes the tax rate we calculated in the last section and actually does something with it. I ended up going back and adding an additional step to the methods written in the last step that also calculates the taxable income (gross income – the lower bounds of the tax bracket)
Let’s say the user’s gross income = $10,000
This puts the user in the 12% tax bracket for any income over $9526 and has a flat tax of $952.50. So the taxable income for this example is going to be $10,000 – $9526 = $474.
*Note: I am aware that this isn’t quuiiittee accurate. It doesn’t take into account that there is another tax bracket below this that is taxed at another rate, but see my note above about balancing done vs perfect. I will come back and rebuild this for V2 once i’ve actually shipped something.
After we have the taxable income and the tax rate, we can then build another method that takes the gross income, applies the above methods to it to calculate the taxable income, tax rate, and flat taxes, and then actually calculates the approximate gross taxes owed. Now we’re getting somewhere! But knowing the taxes owed is only part of the battle. The next step is going to be digging into the Federal budgets and pulling together a breakdown of where all that money actually goes…
Minor Commit: Updated tax calculation methods to calculate taxes owed.
Have you ever actually looked at the proposed Federal Budget? Until today, me neither. It’s not exactly engaging reading a la Game of Thrones.
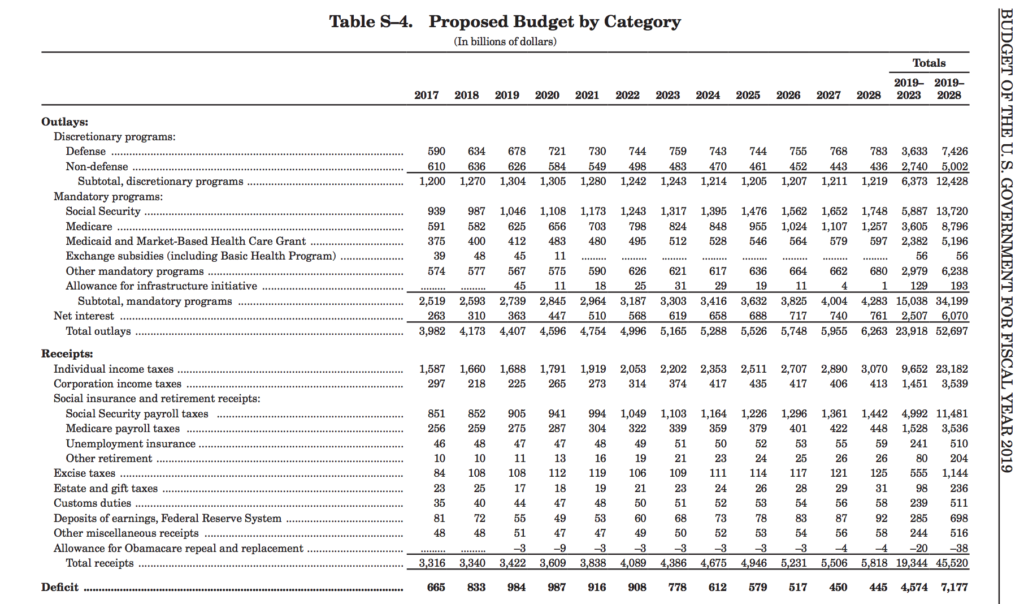
Anyone else notice how the deficit almost doubles after the current administration?
It was, however, a bit enlightening about what the administration thinks about certain departments. But this is about code, not politics. Turning the above tables into code was mostly just tedious transcription work. I transcribed several pages of tables into a spreadsheet so that I could work with the numbers more easily, and then got to work adding a new column that showed each individual line-item as a percentage of the total expenditure. Then started writing a ruby method that takes those percentages, as well as the taxes owed that we calculated in the previous method, and figures out how much of those taxes go to each line item in the budget. Since we’re going to be taking those values and plugging them into the front end to display later on, we’re sticking each one into it’s own variable to access from the erb view.
Now that we know all of the line items that will be displayed we can go back to the front end for a moment to create the results page that will show the user the data that we processed. To make it as simple as possible, this is just a new ‘results’ page that uses an html table to display the information. Right now it’s just static information as a placeholder while I edit the stylesheet, but later on we’re going to be subbing in each variable that we created in the last step.
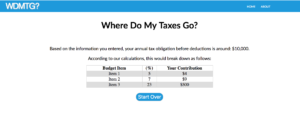
It’s starting to come together.
Milestone Commit 4: Added a results page and formatted table css, created breakdown method for backend.
Next up, I needed to make sure I could keep track of whether a user had been on the page already or if they were brand new to the site. To do this we need sessions. Setting them up is pretty simple as far as the process goes: Enable sessions, set a session secret, and when the session will expire. I don’t need to track the user forever so I set it for a fairly short 24 hours. Thinking about what other data i’d need to store in the session is a little more involved though.
To get things started I set a session ID with a random number. This is what I will use to check if a user has been on the site before. Why is this important? Well, because search engines could dump a user on any page in the sitemap. If they enter the site through the results page and haven’t filled out the form on the index page then they will be very confused as to why there aren’t any numbers displayed. To solve this we just add a little If statement that checks for a Session ID and if it isn’t present then the user will be redirected to the index page.
After that, I stored the income that the user entered into a session variable so that I could access it from other pages. Of course, then I had to set up the core app to accept this new session variable as an input and then stick it in to the tax obligation calculation methods which would process that number and give us the gross estimated tax obligation of the user. That gross obligation can be passed into an instance variable which can be inserted into the ruby injection on our results page to display the total obligation for the user.
At this point, I decided to go back to add a little more front end work- namely, to build out the table that the results would be displayed in. Again, just basic repetition building an HTML table and then playing with the CSS to style it in a way that I liked…. of course, CSS being CSS that was not without a few frustrations and rogue elements. Eventually, it got sorted though and I had a real table that actually looked like something that I might actually be willing to show some friends.
Milestone Commit 5: Set up core app, results page, and sessions.
As I was going along coding the last few sections, it turned out that a coworker decided to do some internet stalking and stumble upon this post. She then wasted no time in informing me that I had the wrong budget! (You know who you are 😉 ) That’s ok though. She pointed me to several resources for more realistic budget information. To make sure that I didn’t forget any of them, I decided to create a ‘resources’ page to add to the site that will display this new information. I also went back and made some adjustments to reflect that this current V1 of the site is showing information for the proposed budget rather than the actual enacted budget. I can update this in V2, or simply make multiple pages/results that show different actual vs enacted budgets. Either way, the goal is transparency so this is still in service of that whichever way I go. For now, the page is just links without any additional descriptions, but that will be remedied before it’s pushed to production.
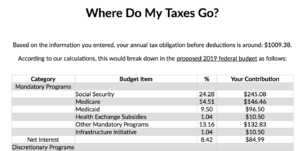
Continuing on with building the main functionality… The next thing to do was to add the ruby injection tags to the results table, and then do the tedious task of adding all the instance variables that we generated with the breakdown method to the tags. Now when a user enters information on the main form, their obligation and the entire breakdown actually shows up in the results table! It works! And looks real!
…just one little problem. The results don’t round the decimal points. Some of the line items have 6-8 decimal points displayed. Since we’re dealing with currency this is a problem. Time to do a little research. The first solution that I found was the ‘.round(2)’ method in ruby. Very handy! I added this and everything looked good until I reached a line item that ended in a ‘0’. Ruby automatically assumes this isn’t relevant and drops it. Now we have the other problem of only one decimal point! Back to StackOverflow… This time I came up with adding: “‘%.2f’ % (result here)”. It worked like a charm. I updated all the result line items with this new code and the results table looks like what I had in my head!
Good enough to show some people!
Milestone Commit 6: Added variables to injection tags on results page, formatted table.
Preparing to Go Live
Now we have a working application that accepts a users income, calculates their gross tax obligation, breaks that down for each line item in the federal budget, and then displays all that information on the results page in a nicely formatted table. We also added some basic CSS to dress it all up nicely and present it in a fairly modern styling. We’re almost to having a live app!
Next up are just some relatively minor details: adding a Privacy Policy and Terms of Service to make sure we’re covered legally, whipping up an About page, filling in the Resources page, and adding some copy to the index to explain the site to a new user. Once we had all those pages, I also made some minor changes to the footer of the layout template to anchor link directly to a disclaimer section on the about page as well as a data sources section, figuring that these are the two most likely pieces of information that ought to be accessed from any other page on the site.
Last up was just some minor bug bashing and testing on different browsers to ensure that things look right.
And Then The Inevitable…
Right about here was where I made a rather large mistake and spent an afternoon trying to recover… In retrospect, I should have seen this coming and could have easily not wasted so much time by implementing proper version control habits – namely only doing one thing per commit…
So what happened?
I decided to do a little research on how I would actually implement the database that I talked about way up at the top of this post and learned that Heroku doesn’t play nice with MySQL, but does have native support for PostgreSQL. So I decided I would try playing with postgres a little to start setting up the website for implementing said database. Why was this a mistake? I didn’t make a baseline commit to git before playing with it. I’ve been doing muddled commits that contain more than one item that had been worked on. Since I didn’t actually know how to implement postgres prior to this, I should have made some kind of commit here just to make sure that I had a clear working version that I could revert to if necessary. I’m sure you can see where this is going…
Many, many webpages of poorly written tutorials later I decided I was hopelessly lost at this new implementation and had somehow managed to break my previously working website… Then it got even better! I tried using git revert to go back to a previous commit, and due to my muddled up commits ended up losing a good chunk of work that I had completed. Fortunately I kept my cool and remembered that because I hadn’t yet pushed the commit to GitHub, I still had the working code up there. Lots of copy/pasting later (because I only wanted certain files and not others that would have been brought over in a full pull), and I had the site once again working. You can bet the first thing I did was make a commit that clearly marked that this was a major commit for the working site.
For the moment I decided to leave out the database and continue getting the site ready to go live. I kept the ActiveRecord gems installed since I know i’ll need them for later, but removed all the code relating to the db. I’ll come back to that as the very last item before I push it live.
Preparing to Go Live 2.0
This time around my mission was simple: get the site ready to go live in every way other than writing to the database. I enlisted some help from my wonderful partner to test what I had already complete, so pushing the site to Heroku was necessary at this point so I could share it. A successful push later and the brand new little baby site was live on the internet! (Do you think that the phrase of ‘pushing’ a new site into the world is a coincidence? 😂) I sent the Heroku link over for some independent testing and in the process immediately discovered an issue with the font not rendering correctly on mobile! Added to the bug list and moved on.
While that first round of testing was happening, I got to work on a few other small things. The first was adding Google Analytics to the site, and the second was adding sharing buttons to the bottom of the page. Both important, and both very easy. We need to be able to measure the use of the site, and hopefully people find it valuable enough to want to share it. As far as adding them go, it was just a matter of adding some code to the header in the case of GA, and to the bottom of the body in the case of the social buttons.
Just a few more things and we’ll be there!
The next thing I tackled was fixing that font issue that I mentioned earlier. It was a simple matter of the font that I was using not loading when I opened the site on mobile – easy fix. I went over to Google Fonts and generated some code to link to the font directly just like you would a stylesheet with your CSS. This way most devices/browsers should be able to find the font when they arrive on site. And then just to make sure that it had a backup, I went through the stylesheet and added ‘sans-serif’ as the fallback anywhere that it was needed. Then at least if the primary font wasn’t working, it would at least look somewhat correct.
A quick push to Heroku and it looked like that issue was sorted out!
I wanted to make sure that when I went live, there was a way to collect donations from the outset. I’m hoping that there will be a bit of interest once it’s launched and wanted to capitalize on that to see if the site could generate a little revenue. Ideally, enough to cover it’s own costs, which although not significant, do add up over time. I could have used one of those tacky PayPal embeddable donate buttons, but I wanted to a) Keep the site modern, and b) Challenge myself to learn a new technology. After all, the initial decision to make this project was all about learning. So all that said, I decided to learn how to use Stripe. Specifically, it’s ‘Checkout’ product.
This is an awesome service that didn’t take as long as I expected to learn how to integrate. Some of it was still over my head in terms of how it worked, but I got the whole thing up and running in a couple of hours using this tutorial by the Stripe team. It helped that on one of my little sample portfolio app (takes a moment to load as it’s on a free Heroku tier) projects I had to learn how to make API calls as well as store environment variables in a safe way to prevent my private keys from accidentally leaking on GitHub. Long story short, learning how to set up Stripe with Sinatra wasn’t as scary as it seemed.
We have a working stripe integration!
Somewhere along the way here I also decided that I wanted to add Congressional compensation data. It seemed like a natural fit as something that someone who is interested in where their tax dollars go might also want to know. I did a little quick digging on the data to see if this was something that could be done quickly or not and immediately realized that this would be a whole process in and of itself. I added this to the ‘future versions’ list and decided that it wouldn’t be in the initial launch version.
At this point the last few details were nothing at all to get ready:
- I decided to add an email capture field in the event anyone wanted to get ongoing updates. About five minutes on MailChimp and I had a nice, customized, email capture field that I could embed on the homepage.
- Updated all off-site links to open in a new tab by using target=”_blank”
- Added a GDPR consent banner generated by a free script generator
- Added the site to Google Search Console
- Updated my Stripe keys on heroku to use the live keys
- Created Robots.txt and a sitemap.xml
- Added the meta descriptions and images to the <head>
- Wrote a readme for the GitHub project
Around here I took a trip to London for the better part of a week and visited MZ who was one of those original two people at the beginning of the post credited with the inspiration for this project. Over dinner I showed him the new site and we had a good laugh that two years later he finally had an answer to his question.
One thing still bugged me though. While I did include the ‘State’ field on the homepage, it didn’t actually do anything at all. I wanted the user to at least feel like there was a reason for asking for that information when they submit the form. So I went out and found the state income tax rates and built a new method that calculated the maximum possible state income tax obligation that a user might have based on their state of residence. The app would then stick that number into a variable that gets passed over to the results page and displayed at the top of the page for the user to see. It’s not perfect, but it at least gives a reason for that field being there. I’ll improve on this in the next version…
One last item to tackle- That darn database! This time I spent a fair bit of time reading up before doing anything – and made sure that I had a clean commit point marking the last known good deploy. This video and this article ended up being my lifesaver that helped me finally figure out postgres. It was only perhaps a couple hours of experimentation, but it felt like ages before I got a successful configuration that worked as it was meant to. But boy did it feel good when it did!
One more push to Heroku, a db:migrate, and a few updated settings to map the new domain name to the Heroku app later, and we had a working V1!
V1 Is ready to go!
Now comes the hard part… launching. I like building and would much rather continue tinkering on new features and diving right into V2 with all the additional tools and data that I want to add to the site. But we must actually ship the thing eventually and this is the right point to do that. It can be a bit scary, putting something out into the world that you’ve worked hard on- especially when you know that it’s not perfect. But I suppose that’s part of life, no? Since this post is about the building of the website, not the launching of the site, i’ll stop here. Check back for future posts on progress or new projects.
Now then… 3…2…1…Launch!